 Core
 Disaster Recovery
 Audit & Protect
 Adaptive Pooling
TL;DR: OneFS 9.13.1.3 runs on Proxmox VE 9.2. The simulator’s OVA cannot be imported as it is, but OneFS boots on a KVM guest with the right virtual hardware. Just want it installed? Skip to the setup instructions.
Dell offers a free simulator for OneFS, the operating system of its PowerScale storage arrays, which many people still know as Isilon. It is a virtual machine that runs the real OneFS.
Dell ships the simulator as an OVA and documents it for VMware Workstation, Fusion, and ESXi.
Importing the OVA into Proxmox works without complaint. The resulting machine boots, asks for permission to format its drives, and then stops with the following messages:
About to format ifs partition for all drives.
WARNING: Proceeding will destroy *all data* on this node!
Are you sure you want to proceed?

(yes or no)> yes
isi_radish is not operational due to missing drive_bay configs
radish exited with status 1

Proceeding with v30 newfs...
<isi_rc> SIGUSR1 received!!!

isi_initial_newfs failed. Please check /var/log/messages for more details
To prevent a DL situation, contact Dell EMC Customer Support immediately:
  [three phone numbers]

Command Options:
1) Enter recovery shell
2) Continue booting
3) Reboot
option>
The cause is the virtual hardware of the imported machine, not the hypervisor. OneFS recognizes KVM and works with KVM’s own virtio devices. It needs its disks on one virtio-scsi controller and three virtio network cards, and the import produces neither.
The simulator OVA
An OVA is a tar archive that contains disk images and an XML file, the OVF, which describes the machine they belong to. The OVF of the simulator describes:
- a FreeBSD guest (OneFS is a FreeBSD derivative) at VMware hardware version 21
- two vCPUs and 6 GB of memory
- three Intel E1000 network cards
- 22 disks on five controllers
| Controller in the OVF | Disks |
|---|---|
| IDE | Disk 1: the 16 GB boot disk |
| LSI Logic 0 | Disk 2: a 512 MB journal disk. Disks 3 to 7: data, 5 GB each |
| LSI Logic 1 | Disks 8 to 12: data |
| LSI Logic 2 | Disks 13 to 17: data |
| LSI Logic 3 | Disks 18 to 22: data |
The 20 data disks are the node’s drives. The 512 MB disk holds the file system journal, which sits in non-volatile memory on a hardware node.
Why the imported machine fails
The machine fails because of the way Proxmox imports an OVF. The importer names each disk by its bus type and its position on the controller and ignores which controller that is. The OVF’s four SCSI controllers each count from zero, so their disks collide.
qm, Proxmox’s command-line tool for virtual machines, stops at the first collision.
# qm importovf 920 9.13.1.3.ovf local-lvm
import failed - cowardly refusing to overwrite existing entry: scsi0
The import wizard in the web interface resolves the collisions silently: the last disk that claims an address keeps it. Seven of the 22 disks survive, namely the boot disk on IDE and six of the data disks. The journal disk is lost.
The import wizard then attaches the surviving SCSI disks to Proxmox’s default controller, an emulated LSI 53C895A, and keeps the E1000 cards. OneFS does not work with either of them on KVM.
The machine that works
Instead of translating the OVF, we built a machine with virtio devices (virtio is KVM’s family of paravirtual devices, the counterpart of VMware’s PVSCSI and VMXNET3).
| The OVF describes | The working machine has | |
|---|---|---|
| Hypervisor | VMware | KVM, visible to the guest |
| Disk controllers | One IDE and four LSI Logic | One virtio-scsi |
| Disks | 22, spread over the five controllers | The same 22, in the OVF’s order, on the one controller |
| Network cards | Three Intel E1000 | Three virtio |
On Proxmox this takes one qm create and a loop.
qm create 9000 --name onefs-template --ostype other --machine pc --bios seabios \
  --cpu host --sockets 1 --cores 2 --memory 6144 --balloon 0 \
  --scsihw virtio-scsi-pci --serial0 socket --vga std --onboot 0 \
  --net0 virtio,bridge=vmbr1 --net1 virtio,bridge=vmbr0 --net2 virtio,bridge=vmbr1

for i in $(seq 1 22); do
  qm set 9000 --scsi$((i-1)) local-lvm:0,import-from=$PWD/9.13.1.3-disk$i.vmdk
done
qm set 9000 --boot order=scsi0
The controller, the disk order, and the network cards matter:
--scsihw virtio-scsi-pcicreates one controller, to which Proxmox attachesscsi0toscsi21as LUNs 0 to 21.- Importing the disks in the OVF’s order puts the boot disk first, the journal second, and the 20 drives after it.
- The three virtio cards are attached in the order internal, external, internal.
Of the other flags:
--balloon 0switches off memory ballooning, which we do not want under a storage node.--vga stdis needed because everything OneFS prints after the kernel messages, including the setup wizard, appears on the VGA console.--cpu hostis simply a habit. The two other CPU models we tried,kvm64andx86-64-v2, worked as well.
The remaining flags are Proxmox defaults that we wrote out.
The command needs no SMBIOS strings, CPU flags, or raw QEMU arguments.
First boot
On the first boot of such a node, the kernel messages show that OneFS has found the hypervisor and the virtio devices.
Hypervisor: Origin = "KVMKVMKVM"
vtscsi0: <VirtIO SCSI Adapter> on virtio_pci0
vtnet0: <VirtIO Networking Adapter> on virtio_pci1
vtnet1: <VirtIO Networking Adapter> on virtio_pci2
vtnet2: <VirtIO Networking Adapter> on virtio_pci3
da1 at vtscsi0 bus 0 scbus2 target 0 lun 0
da2 at vtscsi0 bus 0 scbus2 target 0 lun 1
[19 more]
da22 at vtscsi0 bus 0 scbus2 target 0 lun 15
[...]
About to format ifs partition for all drives.
(yes or no)> yes
[...]
Welcome to the PowerScale configuration wizard.
FreeBSD prints LUNs in hexadecimal, so lun 15 is the 22nd disk.
The node asks before it formats its drives. Answering yes formats the node’s own 20 data disks.
OneFS also probes for hardware that a virtual node will never have. The console of a working node therefore shows lines such as ERROR: 'ib_nvram' failed to load! and Failed cmd: /usr/local/bin/ipmitool lan print 1 before the wizard appears. None of them needs fixing.
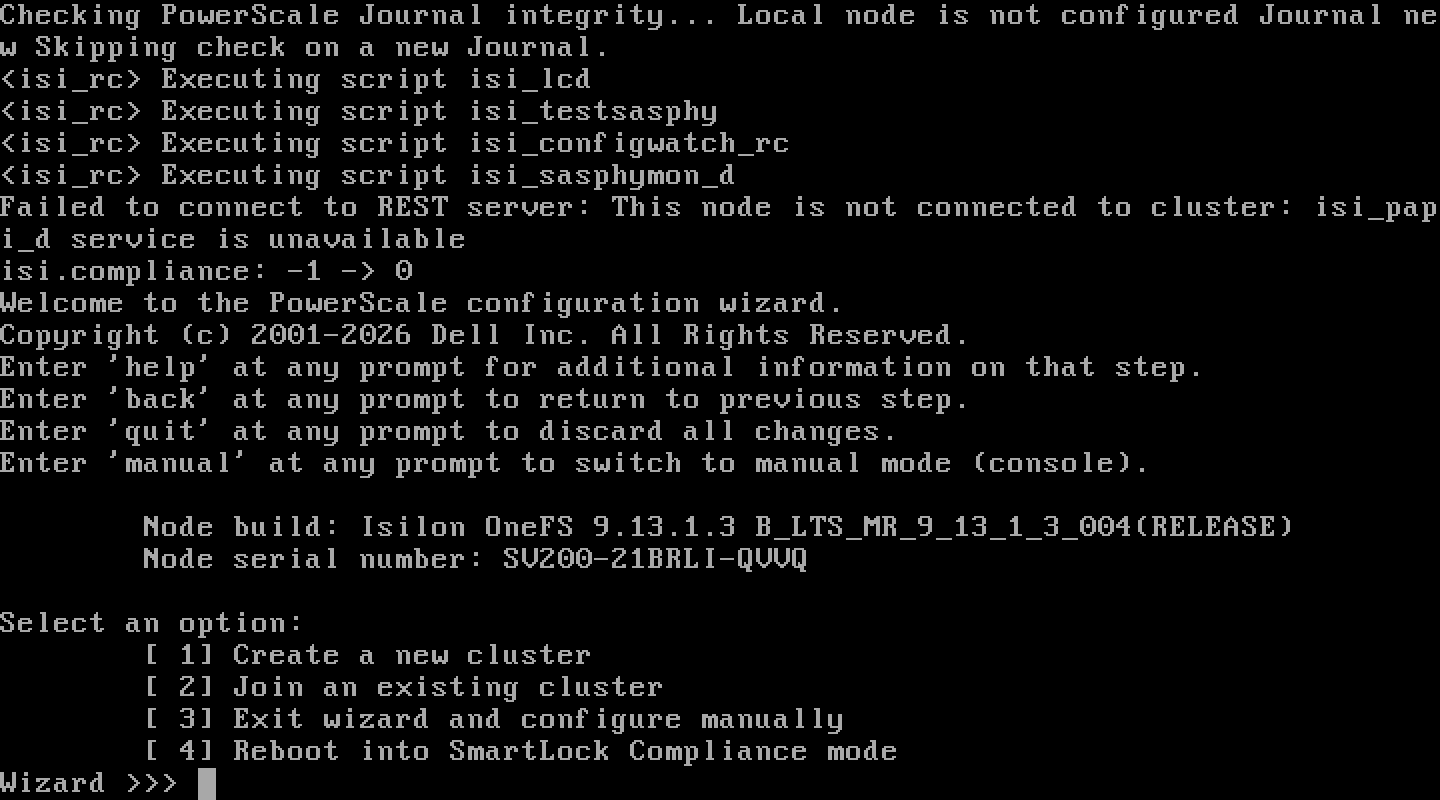
OneFS names the virtual hardware itself. isi_hw_status on a node reports a QEMU/KVM motherboard, a virtio disk controller, and the three vtnet interfaces.
# isi_hw_status
  [...]
   Mobo: KVM (QEMU/KVM Virtual Motherboard)
 DskCtl: VTSCSI (KVM VirtIO SCSI Adapter) (16 ports)
  NetIF: vtnet0,vtnet1,vtnet2
A three-node cluster
Checking the interface order
A OneFS cluster uses two kinds of network. The nodes talk to each other over a private back end called int-a, with an optional second one, int-b, for failover, and clients reach the cluster over the front end, ext-1.
An unconfigured node announces itself with LLDP on its internal interfaces. To see which cards those are, it is enough to run tcpdump on the tap devices, the host-side ends of the virtual network cards.
# tcpdump -nn -e -v -i tap911i0 ether proto 0x88cc
21:22:32  bc:24:11:bc:77:6d > 01:80:c2:00:00:0e, ethertype LLDP
            Port Description TLV (4), length 6: vtnet0

# tcpdump -nn -e -v -i tap911i2 ether proto 0x88cc
21:22:33  bc:24:11:a0:bf:1c > 01:80:c2:00:00:0e, ethertype LLDP
            Port Description TLV (4), length 6: vtnet2

# tcpdump -nn -e -v -i tap911i1 ether proto 0x88cc
          [nothing]
The capture has to run on the tap devices because a Linux bridge does not forward the link-local address that LLDP frames are sent to. It shows that the first and third cards are the back end and the second is the front end.
The back end needs nothing more than a Layer 2 segment that the nodes share. With all nodes on one Proxmox host, a bridge with no ports and no address is sufficient. It amounts to a virtual switch without an uplink.
Creating the cluster
We cloned the template three times, created a cluster in the wizard of the first node, and joined the other two. OneFS then reported the following:
labtest-1# isi status -q
Cluster Name: labtest
Cluster Health:     [ ATTN]
[...]
Size:             167.8G (234.6G Raw) 0 (0 Raw)
VHS Size:         66.8G
Used:             285.9M (< 1%)       0 (n/a)
Avail:            167.6G (> 99%)      0 (n/a)
[...]

labtest-1# isi storagepool nodepools list
ID   Name          Nodes  Node Type IDs  Protection Policy  Manual
-------------------------------------------------------------------
1    kvm_100gb_6gb 1      1              +2d:1n             No
                   2
                   3
The three nodes are in one pool, which OneFS itself named kvm_100gb_6gb. It has 168 GB of usable space after the virtual hot spare.
Together the nodes hold 18 GB of memory and about 7.5 GB of thin-provisioned disk, because their disks start out empty.
The cluster health in the listing is “ATTN”, and a critical event is open on every node. The following sections describe this event and the way nodes are shut down.
The boot disk size
Every node reported that a required mirror on its boot disk, var-crash, was missing. This event does not appear under VMware.
On KVM, the simulator’s 16 GB boot disk is too small for all the partitions OneFS wants to create on it. With a 24 GB boot disk, OneFS creates all of them and the event does not appear. The setup instructions below enlarge the disk before the import. A node that has already booted creates the missing partitions at its next start once its disk has been enlarged.
The ACPI power button
Proxmox’s Shutdown button does not work on these nodes. It presses the virtual power button once, and OneFS answers a single press with this message:
Power button press 1 of 3 within 4 secs: requesting stackProxmox sends one press and then waits for its timeout. We shut nodes down from OneFS instead:
- On an unconfigured node,
shutdownin the configuration console powers the node off. - On a running cluster,
shutdown allfromisi configpowers off all nodes. After the next start the cluster is back with all three nodes.
Conclusion
Dell documents the simulator for VMware. OneFS also brings what it needs for KVM: it recognizes the hypervisor, works with virtio disks and network cards, and reports the hardware as a QEMU/KVM machine. With the right virtual hardware, the simulator runs on Proxmox or plain QEMU.
We found no mention of KVM in Dell’s simulator documentation, and a later release can change this behavior.
Reference
Setup instructions
The instructions were tested with OneFS 9.13.1.3 on Proxmox VE 9.2 and QEMU 11.0. You need:
- the simulator OVA from Dell’s support site
- root on a Proxmox VE host
- 6 GB of memory per node
On thin-provisioned storage a formatted node takes about 2.2 GB, but every node provisions 124.5 GB, so the storage is overcommitted.
All commands run as root in one shell on the Proxmox host and share these variables.
VER=9.13.1.3            # file-name prefix of the OVA and its disks
SRC=/var/tmp/onefs-sim  # directory that holds $VER.ova
STORAGE=local-lvm       # target storage, see: pvesm status
TEMPLATE=9000           # VMID for the template; the next three must be free too
LAN=vmbr0               # existing bridge with an uplink, front end
BACKEND=vmbr1           # new, isolated bridge, back end
1. Create the back-end bridge
The last command applies every pending network change on the host, so read the diff first.
pvesh create /nodes/$(hostname -s)/network --iface $BACKEND --type bridge \
  --autostart 1 --comments "OneFS back end, isolated"
diff /etc/network/interfaces /etc/network/interfaces.new
pvesh set /nodes/$(hostname -s)/network
2. Build the template
The import runs once. The boot disk grows from 16 to 24 GB on the way, so that OneFS has room for all the partitions it wants on KVM. sgdisk -e moves the backup copy of the partition table to the new end of the disk. Without that step OneFS finds the table corrupt and does not boot. The odd :0 after the storage name is a size that Proxmox ignores, because import-from brings its own.
cd $SRC && tar xf $VER.ova && ls $VER-disk*.vmdk | wc -l    # 22

qemu-img convert -f vmdk -O raw $VER-disk1.vmdk boot.raw
qemu-img resize -f raw boot.raw 24G
sgdisk -e boot.raw

qm create $TEMPLATE --name onefs-template --ostype other --machine pc --bios seabios \
  --cpu host --sockets 1 --cores 2 --memory 6144 --balloon 0 \
  --scsihw virtio-scsi-pci --serial0 socket --vga std --onboot 0 \
  --net0 virtio,bridge=$BACKEND --net1 virtio,bridge=$LAN --net2 virtio,bridge=$BACKEND && {
  qm set $TEMPLATE --scsi0 $STORAGE:0,import-from=$SRC/boot.raw
  for i in $(seq 2 22); do
    qm set $TEMPLATE --scsi$((i-1)) $STORAGE:0,import-from=$SRC/$VER-disk$i.vmdk
  done
  qm set $TEMPLATE --boot order=scsi0
  qm template $TEMPLATE
}
A node that already exists with the 16 GB boot disk can be enlarged as well. On LVM-thin, shut the node down and run the following commands.
qm disk resize $VMID scsi0 24G
lvchange -ay pve/vm-$VMID-disk-0
sgdisk -e /dev/pve/vm-$VMID-disk-0
lvchange -an pve/vm-$VMID-disk-0
OneFS creates the missing partitions at the next start.
3. Clone and configure the nodes
for n in 1 2 3; do
  qm clone $TEMPLATE $((TEMPLATE+n)) --name onefs-node$n
  qm start $((TEMPLATE+n))
done
Open each node’s console in the web interface and wait until it asks whether to format the drives. Answer yes, and the wizard follows.
On the first node choose “Create a new cluster”. The wizard shows the license agreement and then asks for:
- new root and admin passwords, a cluster name, and the encoding
- a netmask and an address range for int-a (any private range will do)
- a netmask and an address range for ext-1 (free addresses on your LAN) and a default gateway
- optionally SmartConnect and DNS
The int-b network can stay unconfigured.
On the other nodes choose “Join an existing cluster”. If the list is empty, press Enter to refresh it until the cluster appears.
| Proxmox | In the guest | OneFS role | Bridge |
|---|---|---|---|
net0 | vtnet0 | int-a, back end | Isolated |
net1 | vtnet1 | ext-1, front end | LAN |
net2 | vtnet2 | int-b, back-end failover | Isolated |
Using the web interface
For the OS type “Other”, the Create VM dialog preselects IDE disks, E1000 cards, and the controller “VirtIO SCSI single”. OneFS does not work with any of the three. Set the SCSI controller to “VirtIO SCSI”, attach all 22 disks as SCSI disks in the OVF’s order, and make the network cards VirtIO.
Using plain QEMU
None of this depends on Proxmox’s tooling. The following script starts the same machine with a bare qemu-system-x86_64. It was tested with QEMU 11.0.
The script has to run as root in the directory that holds the unpacked disks. It expects a bridge named br-lan with an uplink and creates the isolated bridge itself. The console is available on VNC display 1, bound to localhost.
A second run starts the node again without touching its disks, and for further nodes NODE can be set to a value from 2 to 9.
#!/bin/bash
set -euo pipefail
VER=9.13.1.3; NODE=1
BACKEND=br-onefs; LAN=br-lan

ip link show $BACKEND >/dev/null 2>&1 || { ip link add $BACKEND type bridge; ip link set $BACKEND up; }
for i in 0 1 2; do
  ip link show onefs$NODE-$i >/dev/null 2>&1 || ip tuntap add dev onefs$NODE-$i mode tap
  ip link set onefs$NODE-$i up
done
ip link set onefs$NODE-0 master $BACKEND
ip link set onefs$NODE-1 master $LAN
ip link set onefs$NODE-2 master $BACKEND

if [ ! -e node$NODE-disk1.qcow2 ]; then
  qemu-img convert -f vmdk -O raw $VER-disk1.vmdk boot.raw
  qemu-img resize -f raw boot.raw 24G
  sgdisk -e boot.raw
  qemu-img convert -f raw -O qcow2 boot.raw node$NODE-disk1.qcow2
  rm boot.raw
fi

DISKS=()
for i in $(seq 1 22); do
  [ -e node$NODE-disk$i.qcow2 ] || qemu-img convert -f vmdk -O qcow2 $VER-disk$i.vmdk node$NODE-disk$i.qcow2
  DISKS+=(-drive "file=node$NODE-disk$i.qcow2,if=none,id=d$i,format=qcow2")
  DISKS+=(-device "scsi-hd,drive=d$i,bus=scsi0.0,scsi-id=0,lun=$((i-1))")
done

qemu-system-x86_64 -enable-kvm -machine pc -cpu host -smp 2 -m 6144 \
  -nodefaults -vga std -vnc 127.0.0.1:$NODE -serial file:node$NODE-serial.log \
  -device virtio-scsi-pci,id=scsi0 "${DISKS[@]}" \
  -netdev tap,id=n0,ifname=onefs$NODE-0,script=no,downscript=no -device virtio-net-pci,netdev=n0,mac=52:54:00:0f:0$NODE:00 \
  -netdev tap,id=n1,ifname=onefs$NODE-1,script=no,downscript=no -device virtio-net-pci,netdev=n1,mac=52:54:00:0f:0$NODE:01 \
  -netdev tap,id=n2,ifname=onefs$NODE-2,script=no,downscript=no -device virtio-net-pci,netdev=n2,mac=52:54:00:0f:0$NODE:02 \
  -daemonize